Tuesday, October 30, 2012
Hurricane Sandy
My heart goes out to all those that are being affected by Hurricane Sandy. Please keep them in your prayers.
Making a Stamped Background
Hello Everyone!
Today's project is making a stamped background paper for my project. It is also posted at http://groups.yahoo.com/group/easywishbladers/.
I feel honored to belong to this group for the past few years. I was given the opportunity to be a moderator. The group owners, the moderating team and the members are all wonderful and so much fun to interact with.

Recently, I discovered a new stamping system called Inkadinkado Stamping Gear by eksucess. I love this system so much because it gives me so much versatility to make unique patterns with stamps. I practiced a bit before I decided to make a background paper, using their system and stamps. I'm having way too much fun with this.

 This
is the Inkadinkado Stamping Gear Deluxe by eksuccess. The set includes a
clear plastic stamp paddle block that is wide on one end and narrower
on the other end. On either end of the paddle it has a tab that fits
into the slots of the gears. This allows you to use either end of the
paddle to fit into the gear slots and space out your stamps to make your
own unique design. I used their stamp which looks like bubbles. You can
position the stamps in any direction on the block. I also tested other
clear and unmounted rubber stamps on the paddle block and it held them
quite nicely.
This
is the Inkadinkado Stamping Gear Deluxe by eksuccess. The set includes a
clear plastic stamp paddle block that is wide on one end and narrower
on the other end. On either end of the paddle it has a tab that fits
into the slots of the gears. This allows you to use either end of the
paddle to fit into the gear slots and space out your stamps to make your
own unique design. I used their stamp which looks like bubbles. You can
position the stamps in any direction on the block. I also tested other
clear and unmounted rubber stamps on the paddle block and it held them
quite nicely.
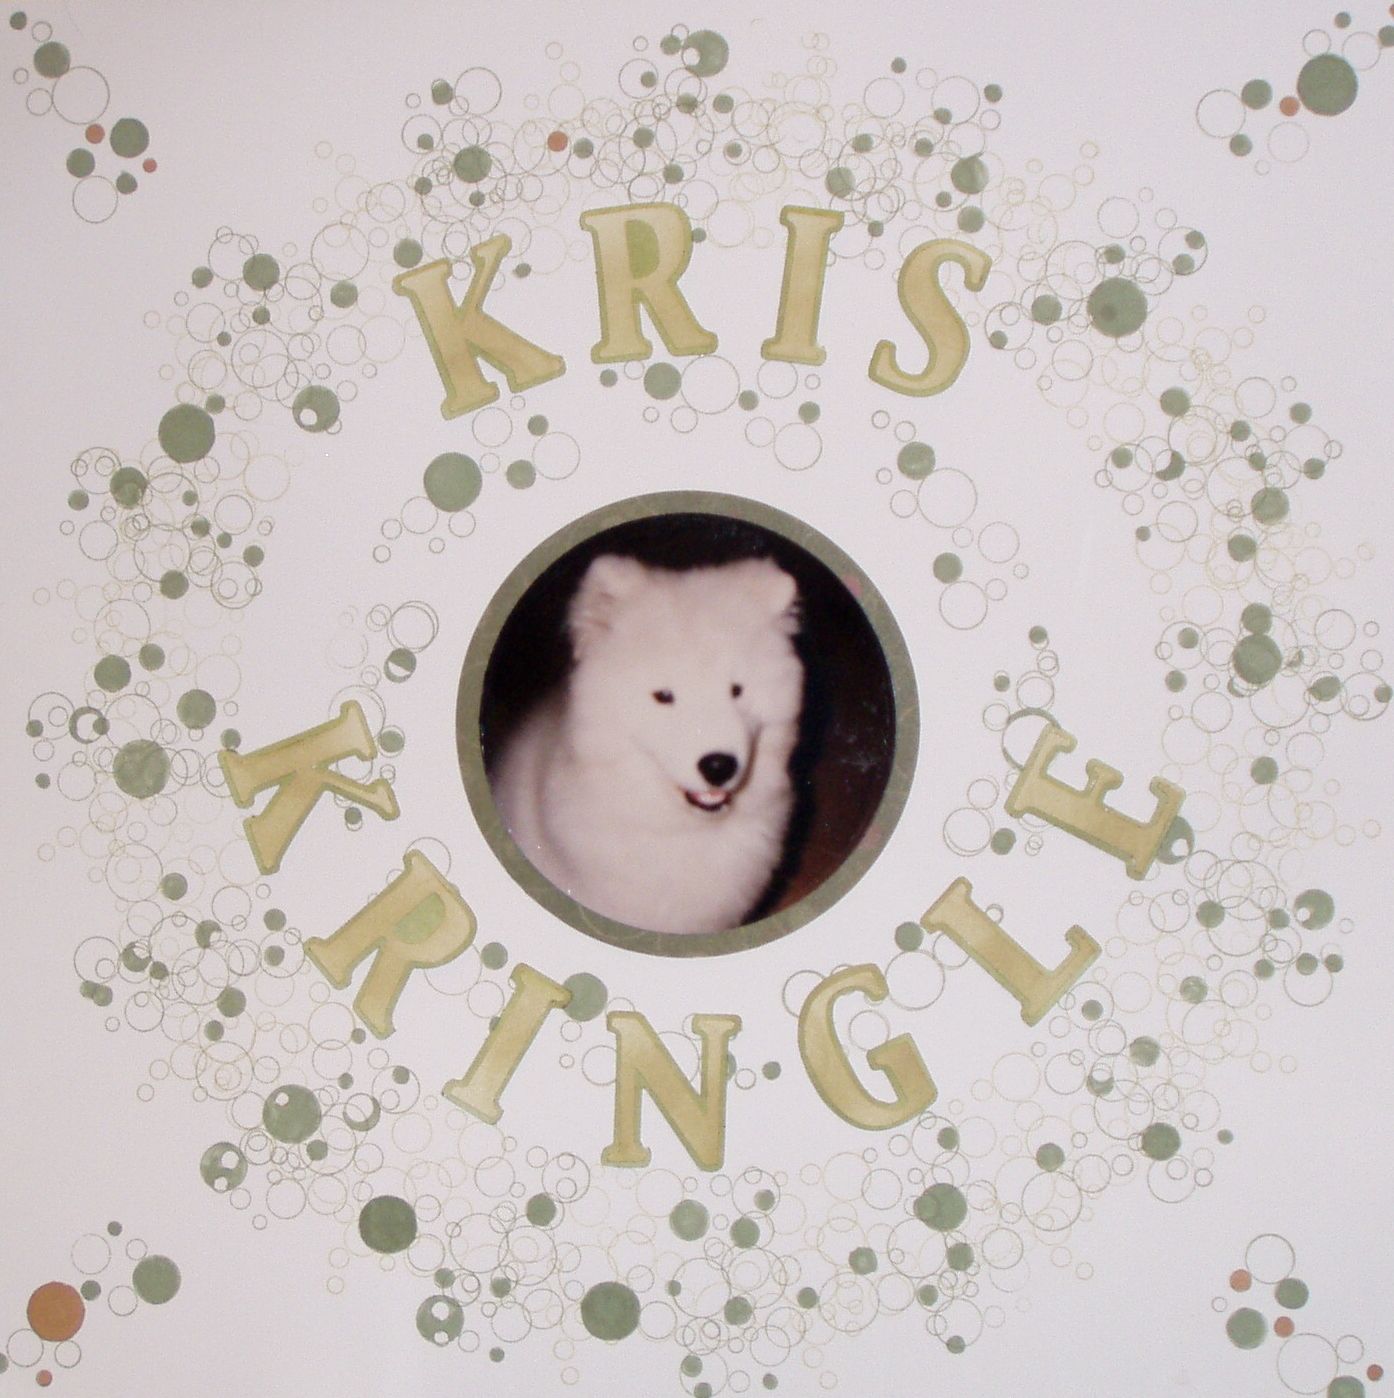
 After
I was done coloring in the bubbles, I cut both layers of letters out of
the Bazzill white and sponged over them with the matching color ink
pads used in the project. Cut out the mat and added the photo of Kris.
After
I was done coloring in the bubbles, I cut both layers of letters out of
the Bazzill white and sponged over them with the matching color ink
pads used in the project. Cut out the mat and added the photo of Kris.
I just love the bubble stamp because Kris had a bubbly personality. He was always smiling. He sure was a cutie pie.
Side note* - Depending on the size of the stamp, you can put 2 stamps on the paddle and stamp at the same time so everything is perfectly lined up. I've used stamps and moved the gears around to make curves back and forth and spirals. I'm still experimenting with this system but I have to say I love it.
There are so many ways to make background papers, let your imagine fly and see what you come up with!
Debbie
Today's project is making a stamped background paper for my project. It is also posted at http://groups.yahoo.com/group/easywishbladers/.
I feel honored to belong to this group for the past few years. I was given the opportunity to be a moderator. The group owners, the moderating team and the members are all wonderful and so much fun to interact with.
Recently, I discovered a new stamping system called Inkadinkado Stamping Gear by eksucess. I love this system so much because it gives me so much versatility to make unique patterns with stamps. I practiced a bit before I decided to make a background paper, using their system and stamps. I'm having way too much fun with this.


 |
| This is what it looks like stamped directly onto Creative Memories Spargo scrapbook page. It looks really nice. |
I chose a sheet of 12 x 12 Bazzill white cardstock.
Centered the small Circle Cog in the middle of the page.
I
used Stampin Up ink pads in River Rock and Mellow Moss and the
Inkadinkado stamp that looks like bubbles and turned it sideways on the
stamping block.
First I stamped the Old Olive around the small gear.
Next step was to line up the Circle Wheel around what I just stamped.
Repositioned the bubbles stamp to the length of the Stamp Paddle Block.
Starting
stamping around the outside of the Circle Wheel using the River Rock
skipping every other slot. The I filled in the spaces using the Mellow
Moss.
After all the stamping was done, I filled in some of the bubbles using a Mellow Moss and a Creamy Carmel marker.
I just love the bubble stamp because Kris had a bubbly personality. He was always smiling. He sure was a cutie pie.
Side note* - Depending on the size of the stamp, you can put 2 stamps on the paddle and stamp at the same time so everything is perfectly lined up. I've used stamps and moved the gears around to make curves back and forth and spirals. I'm still experimenting with this system but I have to say I love it.
There are so many ways to make background papers, let your imagine fly and see what you come up with!
Debbie
Tuesday, October 23, 2012
From Plain to Decorated
I can't believe it's Tuesday already. I seem to have lost track of time since I was away at a scrap fest over the weekend.
For today's Tuesday Tip and Techniques, I decided to show something I did a while ago. When I was first putting my craft room together, I had purchased some small wire cubes to hold my papers. As time goes by, some things just don't seem to function properly for what they were intended. Case in point, I accumulated a ton of papers over the last few years and needed a better way to keep my papers. I went to Michael's and bought the Jet Maxx cubes, using a 1/2 off total purchase coupon. That was a huge savings as the cubes were already on sale at half price and then top that with the coupon. Big savings in the wallet. Here is what they look like stacked up.
.jpg)

.jpg)
.jpg)
.jpg)
For today's Tuesday Tip and Techniques, I decided to show something I did a while ago. When I was first putting my craft room together, I had purchased some small wire cubes to hold my papers. As time goes by, some things just don't seem to function properly for what they were intended. Case in point, I accumulated a ton of papers over the last few years and needed a better way to keep my papers. I went to Michael's and bought the Jet Maxx cubes, using a 1/2 off total purchase coupon. That was a huge savings as the cubes were already on sale at half price and then top that with the coupon. Big savings in the wallet. Here is what they look like stacked up.
.jpg)
They are plain white and I wanted to put something on the sides so I decided to dress them up with vinyl. Using my Wishblade, I decided to put our dogs on the side of the cubes along with their names.

.jpg)
.jpg)
.jpg)
The cubes are no longer just a boring white and every time I see the cubes, I get a smile on my face.
I've used my cutting machines to cut vinyl for holidays to decorate our walls and windows and I'm still using the vinyl cut outs. I just keep them on backer paper for vinyl and cover them with wax paper when I store them. There are many things you can add to vinyl for decorating. I've stamped it, used Copic markers. Puffy Paint, Stickles sprayed it with Krylon webbing spray used punches on it to make borders so far. I've even used a Versamark pad and used embossing powder on it and it turned out beautiful.
If you surf the internet, you'll see vinyl in crafting on glass blocks that are so popular, and also on tiles. Vinyl is quite easy to cut and it really does add a bit of punch to decorating. So go ahead, grab some vinyl and let your imagination go!
Have a great Tuesday!
Debbie
Wednesday, October 17, 2012
ALERT - Blog Candy Giveaway
A while back I discovered a blog by Rosalee, who really has a cute blog and projects. Now she is having a candy giveaway! Woohoo. Stop on over by her and see her projects and enter for her candy giveaway. Her blog is located at http://rosaleescrap.blogspot.com/. Don't forget to give her a little love and leave a comment for her.
Have a great day!
Debbie
Have a great day!
Debbie
Tuesday, October 16, 2012
Tuesday Tips and Tricks
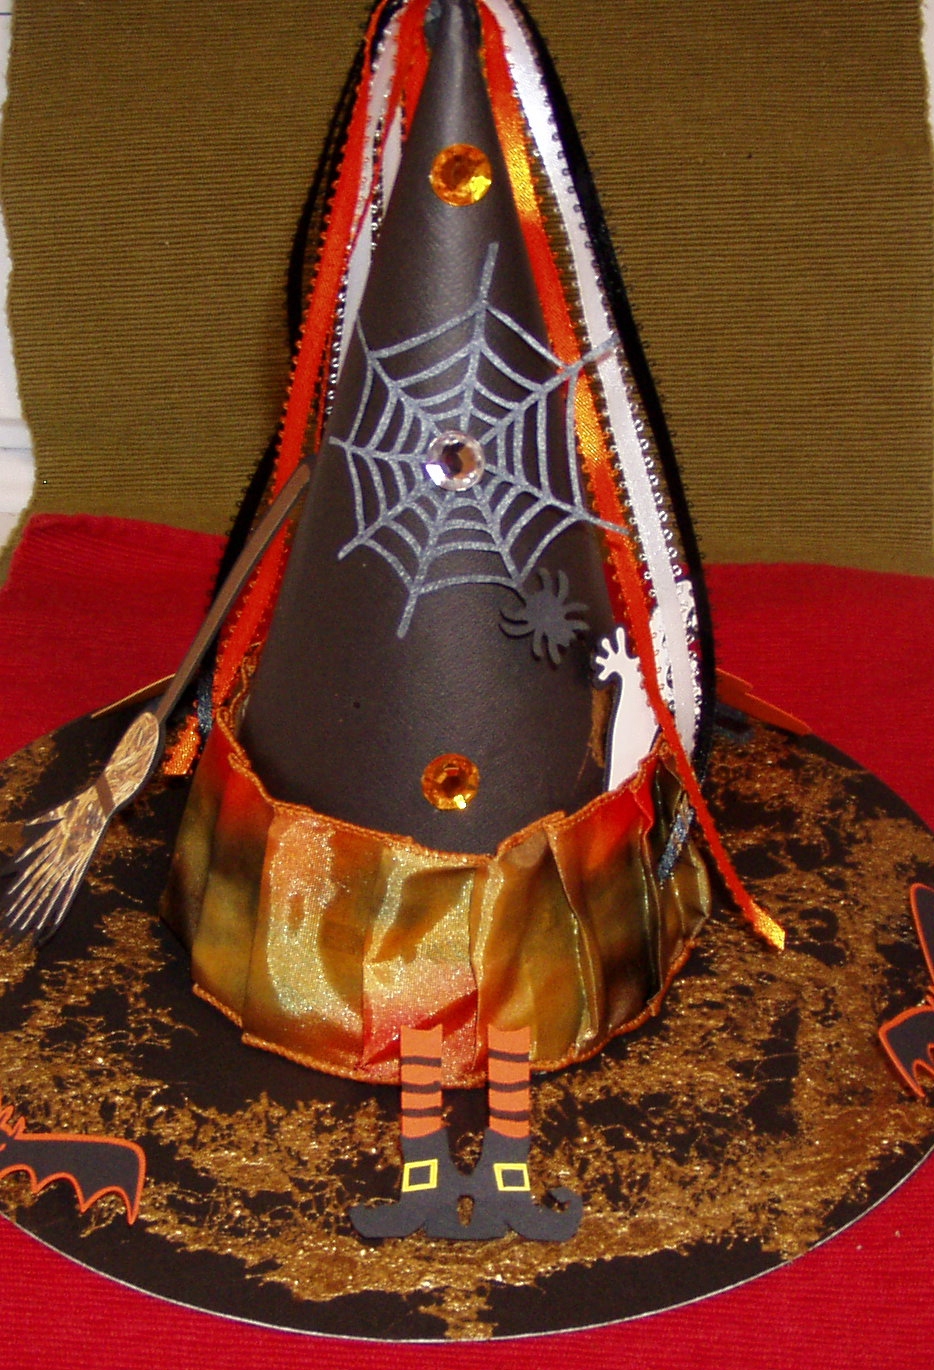
Today I have a cute Halloween project. Check it out!


Here are the steps to make the hat:
1. Roll paper into a cone shape for the top of the hat.
2. Cut a 10" circle out of black paper and another 10" circle out of chipboard. Mount chipboard under the black paper to make it more sturdy. To "cover" the edge of the gray chipboard, I used a black Copic marker and ran it around the edge of the chipboard.
3. Cut orange, black and white ribbon. Used heavy duty double sided tape and wrapped it around the end of the ribbons. Inserted into the tip of the cone.
4. Taped cone closed using heavy duty double sided tape.
5. Folded multi-colored wire ribbon for the band of the hat and used the double sided tape to attach for the band around the hat.
6. Sprayed gold webbing spray around the brim of the hat. It came out really heavy. (What I should have done was gone outside and sprayed the 10" circle for the brim of the hat before I attached it to the cone).
7. I used to belong to a design team that is no longer in business, but I had a bunch of Halloween cutouts already in my stash so I attached them around the hat. I used bats, witches legs, a cauldron, broom and pumpkin. To make the cuts stand up, I used black foam mounting squares. I put one square on the back of the cut design and then butted it against another foam square that I put on the brim. This way it makes the designs stand up.
8. Attached 3 gems to the front of the hat using thick glue dots.
Now all I have to do is pick up my pumpkin tomorrow, hubby will carve it and set the witches hat on top and we will have a cute decoration for our front window! I'll post a photo of the pumpkin once we get it done. We love decorating for Halloween!!
I hope I've inspired you to take something from ordinary and turn it to extraordinary!
Debbie
Tuesday, October 2, 2012
Tuesday Tips and Tricks
Today is the start of Tuesday Tips and Tricks. I am a member and moderator at http://groups.yahoo.com/group/easywishbladers/, and we are implementing tips and tricks for crafters using our cutting machines and other techniques.
Today's project is a Fall/Halloween broom that only took an hour to make. I love how it turned out and it fits perfectly in with my tablescape on our dining room table. Here's what it looks like:

Today's project is a Fall/Halloween broom that only took an hour to make. I love how it turned out and it fits perfectly in with my tablescape on our dining room table. Here's what it looks like:

The supplies I used were:
Brown Cardstock - 11" x 4 1/4" (broom handle)
Yellow Cardstock - 7" x 4 ("straw" bottom of broom)
Scraps of Dark Red, Orange, Dark Green, Apple Green and Tan card stock (leaves and acorns)
Cuttlebug "Forest Branches" embossing folder
Orange ribbon with white and olive green flower print
Small leaf punch - CM
Wishblade used to cut oak leaves
2 Gold Metal Pumpkin Brads
Red double sided tacky tape
Needle to poke holes in log for brads
SU Chocolate Ink pad and sponge
SU Dimensional foam used under the backside of the pumpkin brads
Stickles
Brown twine
Glue, glue dots or hot glue
*For
my oak leaves, the veins cut out of the center so I cut a solid oak
leaf and glued that to the back of the top oak leaf. I used copper and
green color Stickles, and filled in the cut out veins and let those dry
overnight.
Roll
the chocolate card stock into a broom handle shape and seal 11" side
with tacky tape. Using a sponge and the brown ink pad, sponge color all
over the yellow card stock. Take a ruler and yellow card stock, along
the 7" side, draw a line 1/2" down from the top. This is where you stop
cutting your fringes. Take a scissors and cut fringes from the bottom of
the 4" side, up to the line you have drawn. Attach a strip of tacky
tape along the top of the yellow card stock and attach it to the broom
handle. The bottom of the fringe should be even with the bottom of the
brown card stock. Run a strip of tacky tape along the top of the
attached yellow card stock.
Starting
at the top of the broom handle, attach ribbon and wrap it around the
broom handle and attach it to the top of the yellow cardstock. Wrap
twine around the top of the yellow cardstock, hiding the end of the
ribbon and top of yellow card stock. Using glue, glue dots, hot glue, or
foam dimensionals, attach leaves to top and bottom of twine. I
overlapped the leaves for dimension.
Poke
a hole on the upper part of the broom stick and also a hole above the
top row of leaves and attach pumpkin brads. Your broom is complete!
Like
I mentioned earlier, it only took an hour from start to finish. It
really is an easy project. My next broom is going to be 24" tall and I
think I'll make a bunch of small ones as little gifts for an upcoming
scrapping weekend I will be attending this month.
Hope you can take the time to make this project. I'm sure the kids would love to help!
Have a great day!
Debbie
Subscribe to:
Posts (Atom)
