Thursday, November 22, 2012
Tuesday, November 13, 2012
Using Pens & Markers
How do you use your pens and markers in your crafting? Do you use them in your cutting machine or just as stand alone tools?I love using mine with my cutting machines.
I wanted to make a parrot embellishment for my vacation page. I didn't have the color papers that I needed so I found a piece of free artwork online, pixel traced it in Make The Cut program and cut it out. I used my markers to fill in the parrot with the colors from the photo.


Here are some suggestions:
Happy Crafting!
I wanted to make a parrot embellishment for my vacation page. I didn't have the color papers that I needed so I found a piece of free artwork online, pixel traced it in Make The Cut program and cut it out. I used my markers to fill in the parrot with the colors from the photo.

Universal Studios Orlando - Jimmy Buffetts Margaritaville

This is the parrot embellishment

Small and Large Parrot embellishments on page
I used white cardstock to draw out the top layer, inserted a marker in cutting machine. Then I went back and cut the layer and filled it in with markers.
Here are some suggestions:
- There are pen and marker holders made for your cutting machine. Remove your cutting blade and insert the holder with your pen or marker. Now you are ready to let your machine do the drawing of your file before you cut it out.
- Let your machine draw your title or do your writing for you. Some people don't like their own handwriting. There are single line fonts available online.
- Use more than one color to draw your title. Instead of cutting out letters, I chose a font and then I make 2 or 3 sizes for the lettering. Draw the smallest size first. Change out your color and do the next layer in a larger size in another color, same for the 3rd layer. You can add lots of dimension to your title without using layers of paper on our project.
- Metallic pens and markers give a hint of sparkle to your cuts. They really give a nice especially on holiday files.
- If you are stamping and don't have a stamp pad in a certain color, swipe your marker over a sponge and add your color.
Happy Crafting!
Saturday, November 10, 2012
From Trash to Treasure
Does anyone remember the huge wooden paper cutters with the big black heavy metal handle from their school days? I have it!! A few years ago, my husband was taking garbage to our local dump. He met a man who said he was throwing out stuff from one of the schools and the paper cutter was no longer safe to be used around children in the classroom. The stop for the blade was missing.
My husband, always thinking ahead, brought it home. He nailed in a stop for me and I have a wonderful, and very accurate paper cutter. It shows 26 1/2 inches on the metal ruler and has lines from top to bottom edged into the wood. Talk about a great find.


My husband, always thinking ahead, brought it home. He nailed in a stop for me and I have a wonderful, and very accurate paper cutter. It shows 26 1/2 inches on the metal ruler and has lines from top to bottom edged into the wood. Talk about a great find.
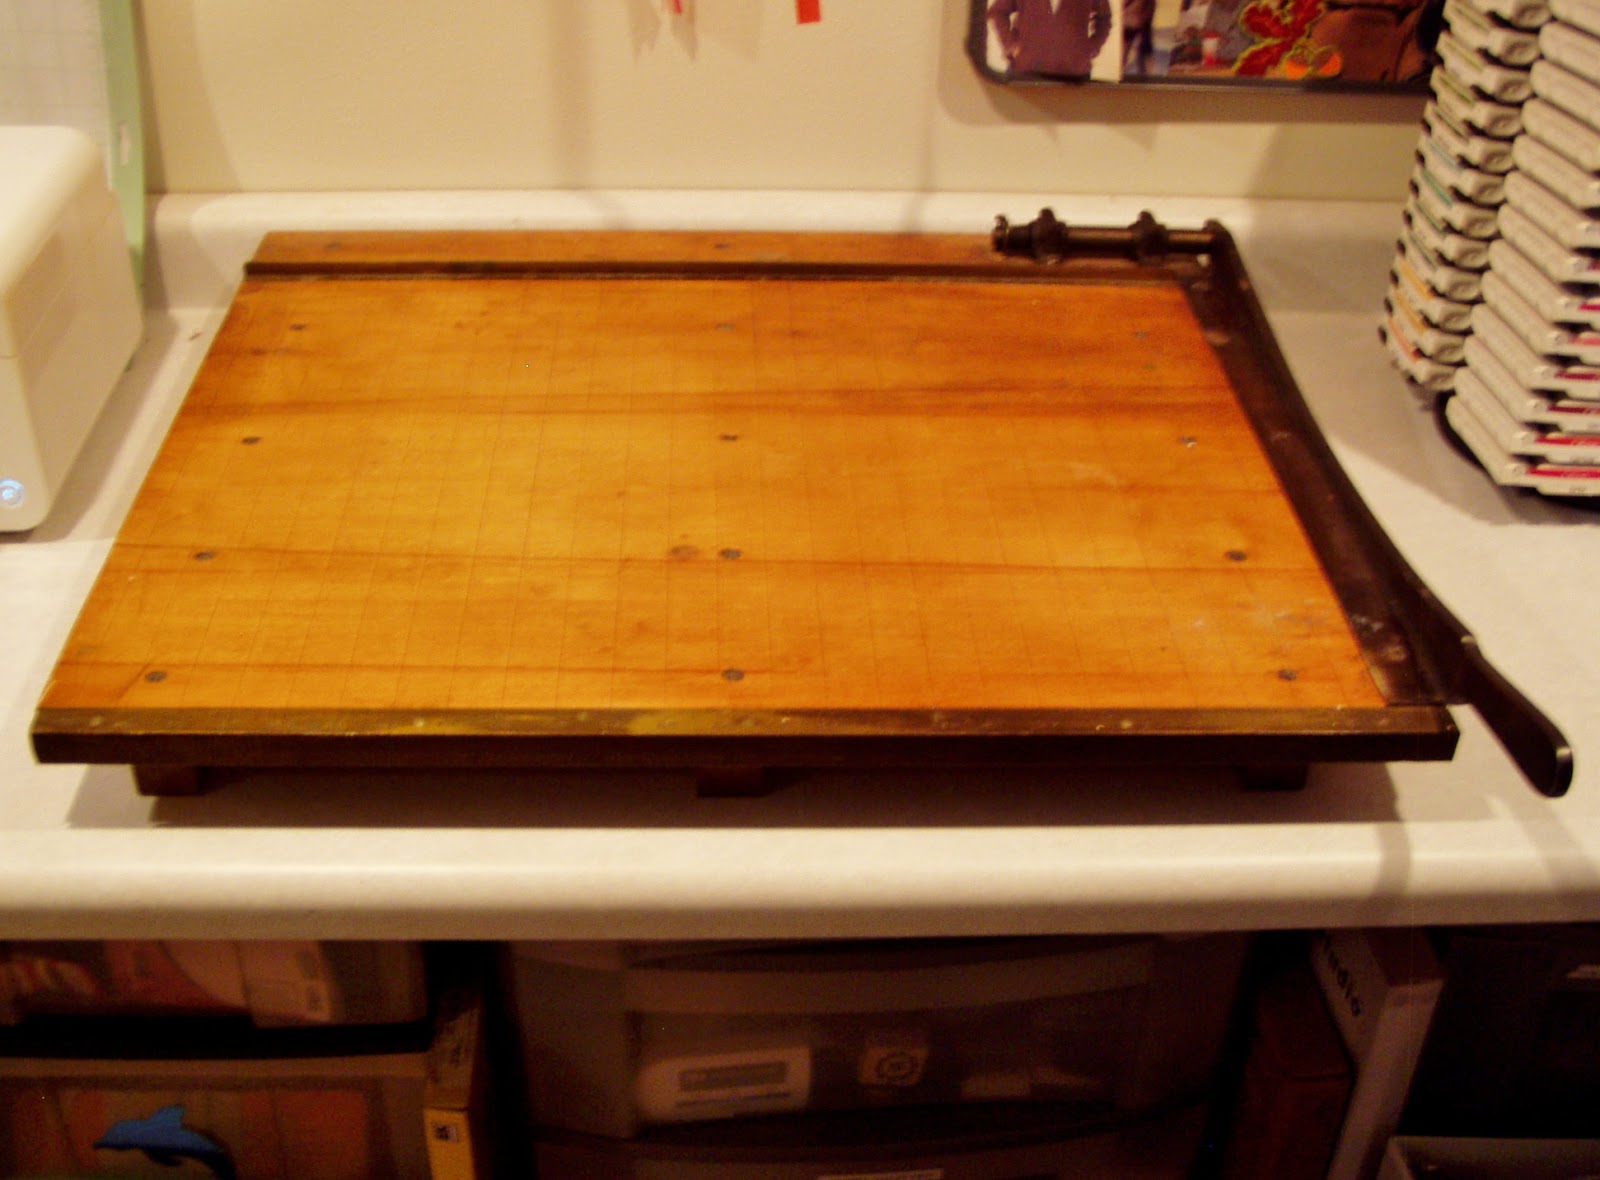
A Treasured Find!

Here is a close up of the ruler on top of board
. The inch lines go from top to bottom of board.
So from what almost was thrown in the trash, has become a very treasured and well used item in my paper crafting. I also use it as a guide for layouts for my scrapbooking.
Here is hoping you come across an old fashioned treasure to help with your crafting!
Wednesday, November 7, 2012
Here's How I Store My File Cuts
Yesterday I posted an idea about how I store my file cuts on the EasyWishbladers group. It's a very easy way to keep track of the files that I cut with my cutting machines.
I use the older big square version of their Power Sort Box that was designed to hold like 600 photos. I wish they would have kept this size box but now they have a slimmer model. Anyway, inside it holds 12 divided Compartment boxes. I also use the Power Sort Dividers that I labeled with my Dynamo Labeler. I like that the box is plastic, yet sturdy. If something were to get spilled on it or dropped on it, I know my files are safe inside. There is quite a bit of space inside so I can really load this box with lots of file cuts.
Here are the photos:
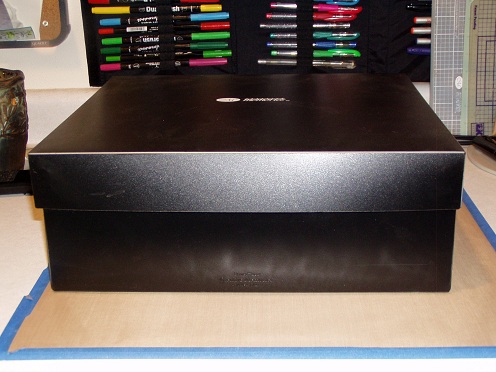
Creative Memories Power Sort Box
(older version)

Inside Cover

Divider Boxes with Labeled Divider Panels

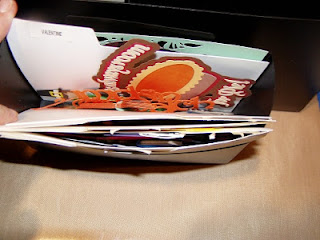
Thanksgiving File Cuts
I have large file cuts that will not fit in the divider boxes, so those are kept in the storage compartment that is built into the lid. This gives you an idea how to keep your file cuts all in one place. If I find a design that I like, I will cut it more than once in different colors or even in just white, so I can decorate it later in the colors I need. It really can't get any easier than this!
Hope this tip helps you in some way. Have a great day!
Tuesday, October 30, 2012
Hurricane Sandy
My heart goes out to all those that are being affected by Hurricane Sandy. Please keep them in your prayers.
Making a Stamped Background
Hello Everyone!
Today's project is making a stamped background paper for my project. It is also posted at http://groups.yahoo.com/group/easywishbladers/.
I feel honored to belong to this group for the past few years. I was given the opportunity to be a moderator. The group owners, the moderating team and the members are all wonderful and so much fun to interact with.

Recently, I discovered a new stamping system called Inkadinkado Stamping Gear by eksucess. I love this system so much because it gives me so much versatility to make unique patterns with stamps. I practiced a bit before I decided to make a background paper, using their system and stamps. I'm having way too much fun with this.

 This
is the Inkadinkado Stamping Gear Deluxe by eksuccess. The set includes a
clear plastic stamp paddle block that is wide on one end and narrower
on the other end. On either end of the paddle it has a tab that fits
into the slots of the gears. This allows you to use either end of the
paddle to fit into the gear slots and space out your stamps to make your
own unique design. I used their stamp which looks like bubbles. You can
position the stamps in any direction on the block. I also tested other
clear and unmounted rubber stamps on the paddle block and it held them
quite nicely.
This
is the Inkadinkado Stamping Gear Deluxe by eksuccess. The set includes a
clear plastic stamp paddle block that is wide on one end and narrower
on the other end. On either end of the paddle it has a tab that fits
into the slots of the gears. This allows you to use either end of the
paddle to fit into the gear slots and space out your stamps to make your
own unique design. I used their stamp which looks like bubbles. You can
position the stamps in any direction on the block. I also tested other
clear and unmounted rubber stamps on the paddle block and it held them
quite nicely.
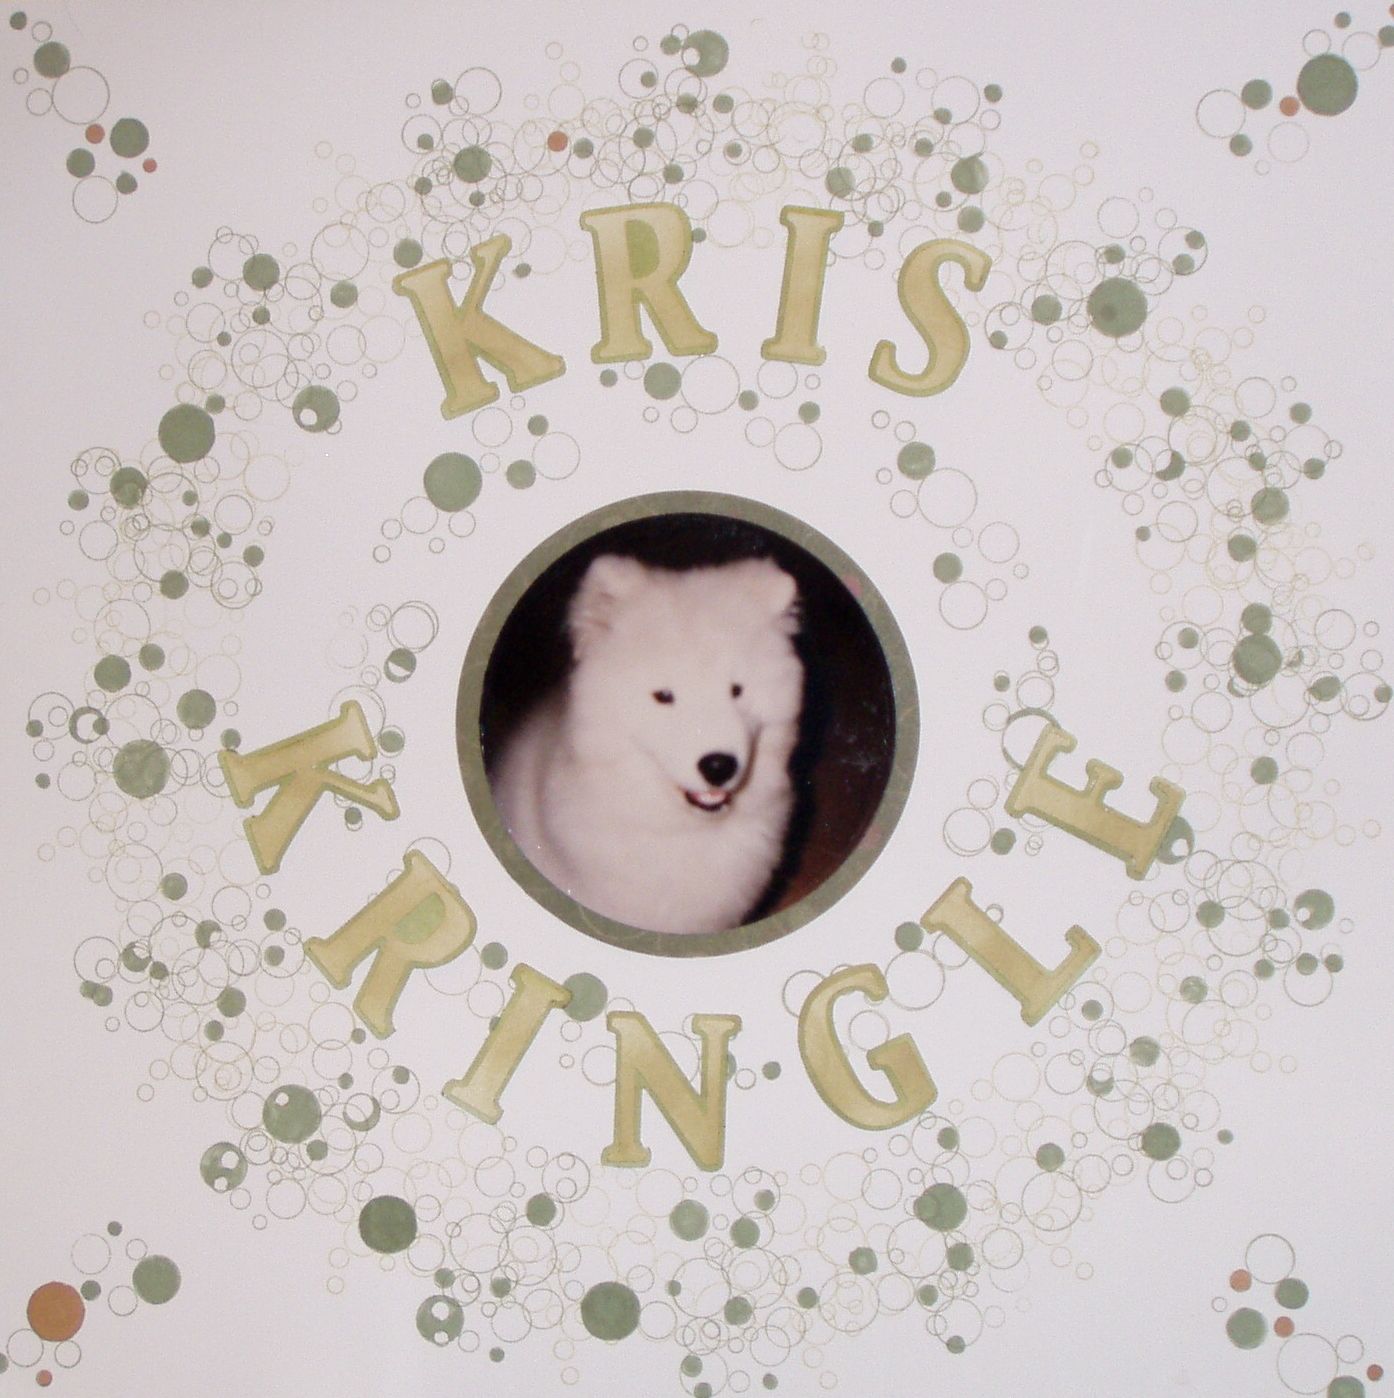
 After
I was done coloring in the bubbles, I cut both layers of letters out of
the Bazzill white and sponged over them with the matching color ink
pads used in the project. Cut out the mat and added the photo of Kris.
After
I was done coloring in the bubbles, I cut both layers of letters out of
the Bazzill white and sponged over them with the matching color ink
pads used in the project. Cut out the mat and added the photo of Kris.
I just love the bubble stamp because Kris had a bubbly personality. He was always smiling. He sure was a cutie pie.
Side note* - Depending on the size of the stamp, you can put 2 stamps on the paddle and stamp at the same time so everything is perfectly lined up. I've used stamps and moved the gears around to make curves back and forth and spirals. I'm still experimenting with this system but I have to say I love it.
There are so many ways to make background papers, let your imagine fly and see what you come up with!
Debbie
Today's project is making a stamped background paper for my project. It is also posted at http://groups.yahoo.com/group/easywishbladers/.
I feel honored to belong to this group for the past few years. I was given the opportunity to be a moderator. The group owners, the moderating team and the members are all wonderful and so much fun to interact with.
Recently, I discovered a new stamping system called Inkadinkado Stamping Gear by eksucess. I love this system so much because it gives me so much versatility to make unique patterns with stamps. I practiced a bit before I decided to make a background paper, using their system and stamps. I'm having way too much fun with this.


 |
| This is what it looks like stamped directly onto Creative Memories Spargo scrapbook page. It looks really nice. |
I chose a sheet of 12 x 12 Bazzill white cardstock.
Centered the small Circle Cog in the middle of the page.
I
used Stampin Up ink pads in River Rock and Mellow Moss and the
Inkadinkado stamp that looks like bubbles and turned it sideways on the
stamping block.
First I stamped the Old Olive around the small gear.
Next step was to line up the Circle Wheel around what I just stamped.
Repositioned the bubbles stamp to the length of the Stamp Paddle Block.
Starting
stamping around the outside of the Circle Wheel using the River Rock
skipping every other slot. The I filled in the spaces using the Mellow
Moss.
After all the stamping was done, I filled in some of the bubbles using a Mellow Moss and a Creamy Carmel marker.
I just love the bubble stamp because Kris had a bubbly personality. He was always smiling. He sure was a cutie pie.
Side note* - Depending on the size of the stamp, you can put 2 stamps on the paddle and stamp at the same time so everything is perfectly lined up. I've used stamps and moved the gears around to make curves back and forth and spirals. I'm still experimenting with this system but I have to say I love it.
There are so many ways to make background papers, let your imagine fly and see what you come up with!
Debbie
Tuesday, October 23, 2012
From Plain to Decorated
I can't believe it's Tuesday already. I seem to have lost track of time since I was away at a scrap fest over the weekend.
For today's Tuesday Tip and Techniques, I decided to show something I did a while ago. When I was first putting my craft room together, I had purchased some small wire cubes to hold my papers. As time goes by, some things just don't seem to function properly for what they were intended. Case in point, I accumulated a ton of papers over the last few years and needed a better way to keep my papers. I went to Michael's and bought the Jet Maxx cubes, using a 1/2 off total purchase coupon. That was a huge savings as the cubes were already on sale at half price and then top that with the coupon. Big savings in the wallet. Here is what they look like stacked up.
.jpg)

.jpg)
.jpg)
.jpg)
For today's Tuesday Tip and Techniques, I decided to show something I did a while ago. When I was first putting my craft room together, I had purchased some small wire cubes to hold my papers. As time goes by, some things just don't seem to function properly for what they were intended. Case in point, I accumulated a ton of papers over the last few years and needed a better way to keep my papers. I went to Michael's and bought the Jet Maxx cubes, using a 1/2 off total purchase coupon. That was a huge savings as the cubes were already on sale at half price and then top that with the coupon. Big savings in the wallet. Here is what they look like stacked up.
.jpg)
They are plain white and I wanted to put something on the sides so I decided to dress them up with vinyl. Using my Wishblade, I decided to put our dogs on the side of the cubes along with their names.

.jpg)
.jpg)
.jpg)
The cubes are no longer just a boring white and every time I see the cubes, I get a smile on my face.
I've used my cutting machines to cut vinyl for holidays to decorate our walls and windows and I'm still using the vinyl cut outs. I just keep them on backer paper for vinyl and cover them with wax paper when I store them. There are many things you can add to vinyl for decorating. I've stamped it, used Copic markers. Puffy Paint, Stickles sprayed it with Krylon webbing spray used punches on it to make borders so far. I've even used a Versamark pad and used embossing powder on it and it turned out beautiful.
If you surf the internet, you'll see vinyl in crafting on glass blocks that are so popular, and also on tiles. Vinyl is quite easy to cut and it really does add a bit of punch to decorating. So go ahead, grab some vinyl and let your imagination go!
Have a great Tuesday!
Debbie
Wednesday, October 17, 2012
ALERT - Blog Candy Giveaway
A while back I discovered a blog by Rosalee, who really has a cute blog and projects. Now she is having a candy giveaway! Woohoo. Stop on over by her and see her projects and enter for her candy giveaway. Her blog is located at http://rosaleescrap.blogspot.com/. Don't forget to give her a little love and leave a comment for her.
Have a great day!
Debbie
Have a great day!
Debbie
Tuesday, October 16, 2012
Tuesday Tips and Tricks
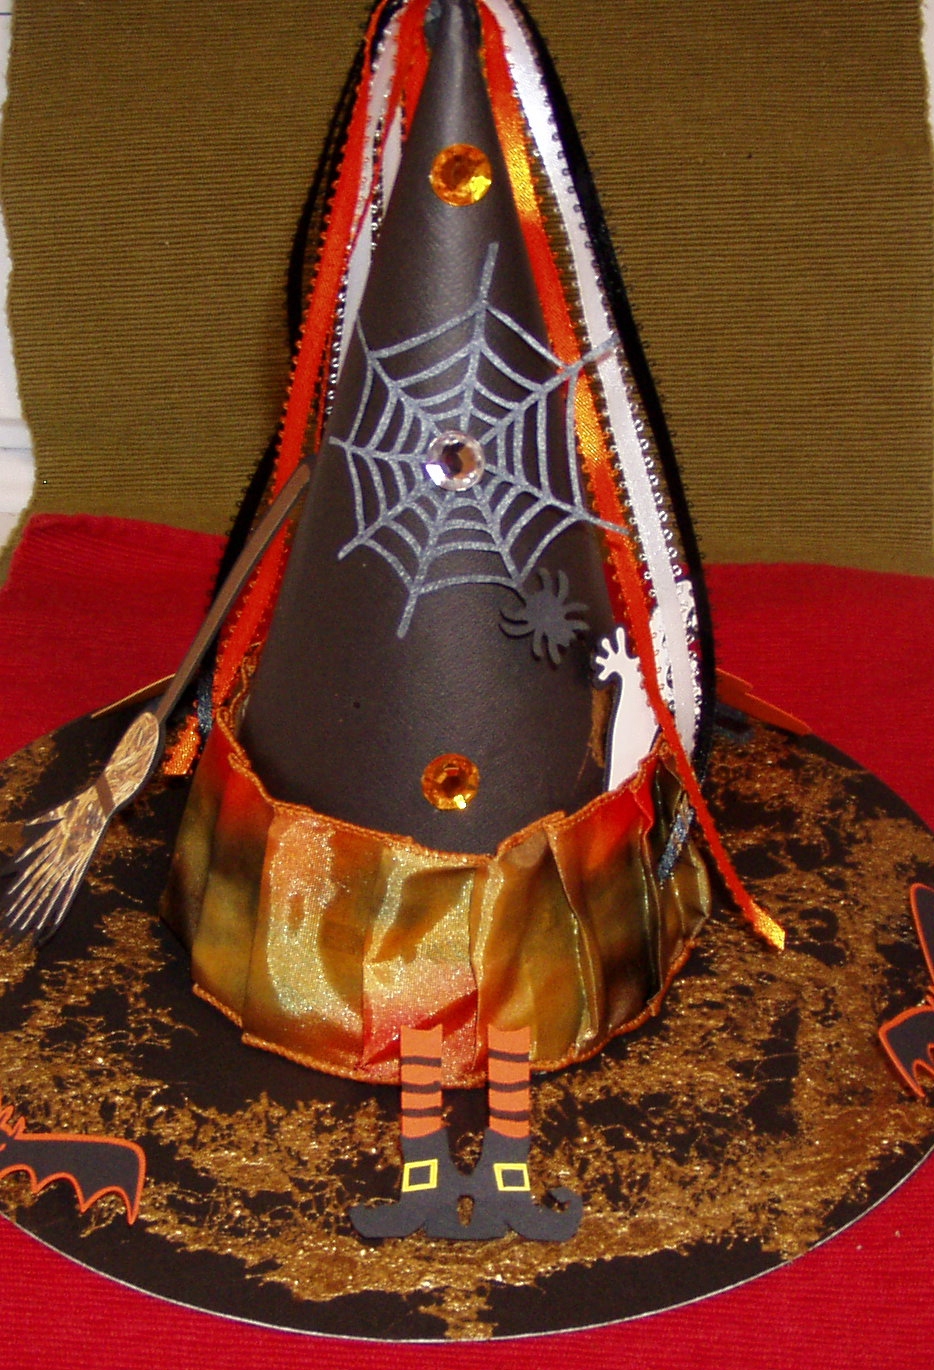
Today I have a cute Halloween project. Check it out!


Here are the steps to make the hat:
1. Roll paper into a cone shape for the top of the hat.
2. Cut a 10" circle out of black paper and another 10" circle out of chipboard. Mount chipboard under the black paper to make it more sturdy. To "cover" the edge of the gray chipboard, I used a black Copic marker and ran it around the edge of the chipboard.
3. Cut orange, black and white ribbon. Used heavy duty double sided tape and wrapped it around the end of the ribbons. Inserted into the tip of the cone.
4. Taped cone closed using heavy duty double sided tape.
5. Folded multi-colored wire ribbon for the band of the hat and used the double sided tape to attach for the band around the hat.
6. Sprayed gold webbing spray around the brim of the hat. It came out really heavy. (What I should have done was gone outside and sprayed the 10" circle for the brim of the hat before I attached it to the cone).
7. I used to belong to a design team that is no longer in business, but I had a bunch of Halloween cutouts already in my stash so I attached them around the hat. I used bats, witches legs, a cauldron, broom and pumpkin. To make the cuts stand up, I used black foam mounting squares. I put one square on the back of the cut design and then butted it against another foam square that I put on the brim. This way it makes the designs stand up.
8. Attached 3 gems to the front of the hat using thick glue dots.
Now all I have to do is pick up my pumpkin tomorrow, hubby will carve it and set the witches hat on top and we will have a cute decoration for our front window! I'll post a photo of the pumpkin once we get it done. We love decorating for Halloween!!
I hope I've inspired you to take something from ordinary and turn it to extraordinary!
Debbie
Tuesday, October 2, 2012
Tuesday Tips and Tricks
Today is the start of Tuesday Tips and Tricks. I am a member and moderator at http://groups.yahoo.com/group/easywishbladers/, and we are implementing tips and tricks for crafters using our cutting machines and other techniques.
Today's project is a Fall/Halloween broom that only took an hour to make. I love how it turned out and it fits perfectly in with my tablescape on our dining room table. Here's what it looks like:

Today's project is a Fall/Halloween broom that only took an hour to make. I love how it turned out and it fits perfectly in with my tablescape on our dining room table. Here's what it looks like:

The supplies I used were:
Brown Cardstock - 11" x 4 1/4" (broom handle)
Yellow Cardstock - 7" x 4 ("straw" bottom of broom)
Scraps of Dark Red, Orange, Dark Green, Apple Green and Tan card stock (leaves and acorns)
Cuttlebug "Forest Branches" embossing folder
Orange ribbon with white and olive green flower print
Small leaf punch - CM
Wishblade used to cut oak leaves
2 Gold Metal Pumpkin Brads
Red double sided tacky tape
Needle to poke holes in log for brads
SU Chocolate Ink pad and sponge
SU Dimensional foam used under the backside of the pumpkin brads
Stickles
Brown twine
Glue, glue dots or hot glue
*For
my oak leaves, the veins cut out of the center so I cut a solid oak
leaf and glued that to the back of the top oak leaf. I used copper and
green color Stickles, and filled in the cut out veins and let those dry
overnight.
Roll
the chocolate card stock into a broom handle shape and seal 11" side
with tacky tape. Using a sponge and the brown ink pad, sponge color all
over the yellow card stock. Take a ruler and yellow card stock, along
the 7" side, draw a line 1/2" down from the top. This is where you stop
cutting your fringes. Take a scissors and cut fringes from the bottom of
the 4" side, up to the line you have drawn. Attach a strip of tacky
tape along the top of the yellow card stock and attach it to the broom
handle. The bottom of the fringe should be even with the bottom of the
brown card stock. Run a strip of tacky tape along the top of the
attached yellow card stock.
Starting
at the top of the broom handle, attach ribbon and wrap it around the
broom handle and attach it to the top of the yellow cardstock. Wrap
twine around the top of the yellow cardstock, hiding the end of the
ribbon and top of yellow card stock. Using glue, glue dots, hot glue, or
foam dimensionals, attach leaves to top and bottom of twine. I
overlapped the leaves for dimension.
Poke
a hole on the upper part of the broom stick and also a hole above the
top row of leaves and attach pumpkin brads. Your broom is complete!
Like
I mentioned earlier, it only took an hour from start to finish. It
really is an easy project. My next broom is going to be 24" tall and I
think I'll make a bunch of small ones as little gifts for an upcoming
scrapping weekend I will be attending this month.
Hope you can take the time to make this project. I'm sure the kids would love to help!
Have a great day!
Debbie
Sunday, September 23, 2012
Challenge 5
Challenge 5 for the live Above Rubies Studio is to make a project out of paper and adhesive only. Pictures are allowed. So here is what I did. Boy I was working fast and furious!

I know, tease me all you want. It's officially fall and I just did a Spring layout. Hey at least I finally had something to challenge me! I had a hard time figuring out how to make the birds stand out a bit but pop dots are allowed so I used them under the birds. Woohoo!!
Hope you are having a great day!
Debbie
Saturday, September 22, 2012
Using Teal - Above Rubies challenge
Well it's been a busy morning in the craft room. The challenge given was to use the color teal and 7 circles. Good thing too because I wanted to get my dolphin photos scrapped from our vacation. Woohoo. So here is what I call "Circle of Life".

The dolphins go up and down the river next to the campground at Patrick Air Force Base and when they find mullet to feed on, they chase them in a circle. The seagulls and other birds follow the dolphins because they know the dolphins are churning up food. Such is the circle of life.

The dolphins go up and down the river next to the campground at Patrick Air Force Base and when they find mullet to feed on, they chase them in a circle. The seagulls and other birds follow the dolphins because they know the dolphins are churning up food. Such is the circle of life.
Friday, September 21, 2012
Space - Subway Art Challenge
These photos submitted for Above Rubies Studio Subway Art challenge. I printed these out on paper, layered on top of papers in the Mystery Box and stamped stars in white all over the papers. Great way to make a type of subway art for our trip to NASA's Kennedy Space Center.


Saturday, August 25, 2012
5 Star Card
Recently I re-discovered a wonderful lady who is responsible for my interest in scrapbooking and cardmaking. I discovered DIY Scrapbooking 8 years ago with Sandi Genovese while I was at home recovering from heart surgery. I started watching her every day and I couldn't get enough of what I was seeing. Once I started getting my strength back, I started scrapbooking. What a wonderful hobby! So after the show was discontinued, it was like an old friend who had moved away and never to be heard from again. Well, I don't know what made me Google her name recently but to my surprise, she has an online show called Scrapbook Showgram - Scrapbooking with Sandi Genovese at you can find her at : http://scrapbookshowgram.com/. She has videos of her projects and you can follow along. I'm loving it. So having said all this, here is my take on Sandy's 5 Star Birthday card. I changed it up and will be giving it to a friend who also has her own scrapbooking club at her house which I try to attend 4 times a month. We have an 18 hour scrapbooking weekend coming up in October and it's just a little something to give her for being such a wonderful hostess. Here are the photos of my card. I tried to use CM as much as possible since she is a CM rep and I used mostly the CM Cricut carts along with Storybook Creator 4 to print background papers. Hope she likes what I've done!
Hope you enjoyed the photos and have a wonderful weekend.
Debbie
 | |
| Page 1 Heritage/Memories using Cricut Heritage Cart and CM Storybook 4 "Serenity" paper. |
 | |
| Spring - CM Storybook Creator 4 background paper and CM border. |
 | |
| CM Cheerful Seasons Cart along with CM Disney Sticker at the top. |
 |
| Fall - CM Cheerful Seasons Cart |
 |
| Christmas - CM 'Tis The Season cart |
Debbie
Friday, August 3, 2012
It's been a long time...
Wow, it's been over a year since I last blogged. I guess I felt it was going nowhere so I just didn't bother keeping up. Sad to think like that, I know. But the past year and a half have been filled with many blessings which I am grateful for.
In the past year alone, we've had to deal with my step-dad and my step-mom deaths. Not to mention very close friends who passed which really have thrown us for a loop. In total, we had to deal with 9 deaths in the space of 6 months. Every time we turned around there was another phone call. It really makes one appreciate life and those close to us. So now I still have my parents who are living, in good health and I hope it will be many years before I lose either of them.
This past winter, we took our new travel trailer and went to Florida for 4 months and loved it. It was hubby, myself and our 2 female labs and down the road we went. We try to camp at military campgrounds as often as possible on the trip and our final destination was Patrick Air Force base which has the Manatee Cove Campground. What an awesome place. They have made improvements there which made our stay even more memorable than the last time we were there. The campground hosts are awesome and they are just a font on information so it really was fun. Nothing like making new friends ! I even took along my Cricut Imagine and scrapbooked just about every day. With my computer, printer, Cricut Imagine and Gypsy, I kept pretty busy during the days there. I would sit outside and set the Imagine up on the large metal picnic table, pull the awning down on the trailer and sit in the shade and craft. Nothing like having relaxing fun. Everyday I would see the dolphins swim up and down the river and chase fish for their meals. It was really a beautiful sight.
So, now that we've been back home and settled back into a routine, it's time for me to get back to some serious crafting. I already have our scrapbook done from our trip so that's out of the way. Now it's time to really play.
I bought the new Fiskars Fuse and I love that machine. I sold my electric Big Shot because it just could not cut chipboard and a few other things. The Fiskars Fuse leaves that machine in the dust, in my opinion. I've test it out on really thick chipboard and it cuts it like a hot knife going through a cold stick of butter. WOW, I'm really impressed and I love the steel dies and expansion packs. Granted the machine is a bit pricey but worth every last penny. It really leaves a good impression for embossing and die cutting.
That's it for now, I'm off to do a bit of crafting which I will be posting soon. Hope you are all having a wonderful day!
Debbie Z.
Subscribe to:
Posts (Atom)